If there was a piece of interwebs kit I would like to buy flowers, it would without doubt be Amazon’s Elastic Beanstalk with autoscaling.. Couple it with the Lucee scripting language and I’d happily take it home to meet my parents..
After much experimentation and many iterations (failed attempts and hair-pulling), I’ve managed to deploy Lucee applications (with my fave framework.. CFWheels) to the AWS Elastic Beanstalk platform and have it running reliably in production for a number of months.
My setup is a bit more complex than described below, but hopefully these bare bones will get you started on the path to automated utopia.. Those bare bones will result in a finished .war file that you can upload to EB using their deploy by file upload feature. You could also use the AWS command line tools, AWS toolkit for Eclipse, a Jenkins plugin or one of the many SaaS deployment platforms around.
I personally use Jenkins (on an AWS EC2 instance) to pull, build, test and deploy. I prefer this type of setup as there is much less margin for human error, and the resulting 60Mb+ war file is transferred within your Virtual Private Cloud rather than travelling across the interwebs if you were to manually upload it for every deployment.. oh, and it’s open source.
At a high level, I will outline how to download the Lucee server war file, combine your application’s code, and use some AWS sorcery to configure your Lucee application. There are some pre-requisites:
- The settings that you would normally configure in Lucee admin, should be in Application.cfc (See the Export feature in Lucee admin)
- The commands to create the finished war file are written for Linux (If you’re Windows inclined , you could either ‘translate’ them to Windows commands, try Cygwin or a Virtual Machine)
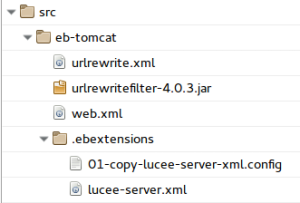
- You’ll need a src/ directory in your application containing the files outlined below
- An AWS account with an empty Tomcat 8 Elastic Beanstalk environment
In a nutshell, what happens is the Lucee jars, your code and some config files are all copied to the “build” directory, then zipped into a sexy war file ready for upload/deploy to the Elastic Beanstalk environment.
src directory
src/eb-tomcat/web.xml
src/eb-tomcat/urlrewritefilter-4.0.3.jar
src/eb-tomcat/urlrewritefilter.xml
src/eb-tomcat/.ebextensions
src/eb-tomcat/.ebextensions/lucee-server.xml
src/eb-tomcat/.ebextensions/01-copy-lucee-server-xml.config

These are configuration files.. for a production application, you’ll need to provide your own lucee-server.xml and most likely your own rewrite rules in urlrewrite.xml. If you don’t need url rewriting, then remove all reference to them. The .ebextensions execute EB container commands.. the one provided simply copies your lucee-server.xml file into place. To create your finished war file, cd to your application’s root directory then run these commands. I’d suggest creating a shell script.. and if you feel adventurous, allow an ‘environment’ option that will create different environment builds for your application’s deployment pipeline
# some vars..
DOWNLOADS_PATH="/tmp/downloads/"
LUCEE_VERSION="4.5.1.000"
LUCEE_WAR="lucee-$LUCEE_VERSION.war"
LUCEE_WAR_PATH="$DOWNLOADS_PATH$LUCEE_WAR"
FINISHED_WAR_PATH="/var/www/myapp/war/"

# ensure the required packages are installed
sudo apt-get install unzip wget
# sudo yum install unzip wget # (or using yum)

# create required directories
mkdir build
mkdir -p $DOWNLOADS_PATH
mkdir -p $FINISHED_WAR_PATH
# only download the lucee war file once
if ! [ -e "$LUCEE_WAR_PATH" ]
then
  wget -O $LUCEE_WAR_PATH http://bitbucket.org/lucee/lucee/downloads/$LUCEE_WAR
fi

# unzip the lucee war file into the build utility directory
unzip $LUCEE_WAR_PATH -d build
rm -rf build/assets

# explicitly copy required code (this is cfwheels specific.. but just plonk in your own directory names)
cp -r config controllers customtags events images javascripts models plugins  stylesheets tests views wheels build
cp -r Application.cfc index.cfm rewrite.cfm root.cfm build
# remove any peksy files that you don't want deployed to production
rm -r build/favicon.ico build/License.txt
# copy config files
cp -r src/eb-tomcat/.ebextensions build
cp -f src/eb-tomcat/web.xml build/WEB-INF/web.xml
# copy tuckey url rewrite jar if required
cp src/eb-tomcat/urlrewritefilter-4.0.3.jar build/WEB-INF/lib/urlrewritefilter-4.0.3.jar
cp src/eb-tomcat/urlrewrite.xml build/WEB-INF/urlrewrite.xml

# this is how I force my app into 'production' mode.. again very cfwheels-centric
rm build/config/environment.cfm
echo 'set(environment="production");' > build/config/environment.cfm
# create le war file
cd build && zip -r -q $FINISHED_WAR_PATH"app-production-master.war" . && cd ..
# cleanup
rm -r build
This should give you a production ready war file located at: build/app-production-master.war. Now you can manually upload your app-production-master.war and be on your way..
Some of my recommendations:
- Build in the cloud using Jenkins (or your choice of CI server)
- Host the Lucee war file in your own S3 bucket.. you’re less at the mercy of 3rd parties connectivity issues.
- You can easily incorporate additional jar files as per the tuckey rewrite tool.. just copy them into
build/WEB-INF/lib/
Any suggestions, improvements & feedback welcome.

